Summary
To support multiple shifts per day and incorporate live interaction with shifts along with orders and appointments, ShowMgr recently setup a new view on Scheduler. Now you can interact with shift assignments in all views, but especially the Resource List view. This improved functionality allows users to manage shifts directly within Scheduler, removing the need to continuously toggle between Scheduler and Shift Assignment. This article walks through the difference between shift assignments, shifts, and templates, how to manage these shifts directly in Scheduler, and perform basic searches.
There are a few different objects we are lumping together when we say "Shift". We have the shift, shift assignment and the shift assignment template.
Shift assignment is now primarily run through Scheduler. We also now have sections off the navigation to manage shifts and manage templates. These are the same features previously used on ShowMgr , however they may display differently now. For example, the shift assignment page previously had buttons to manage on a popup, however these are now part of the navigation and have filters and saved searches for better management.
- Popup window to ask the user if they would like to create an order, appointment or shift to ensure users get to the proper forms quickly
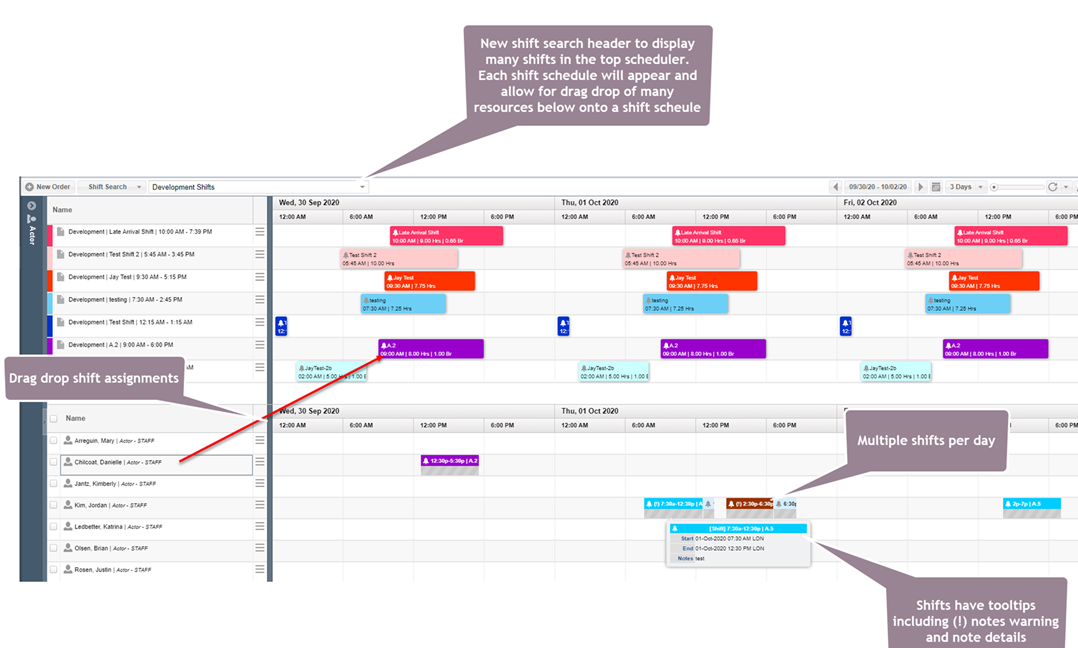
- New shift search header at the top of Scheduler. This search will display many shifts in the top scheduler. Each shift schedule will appear and allow for the drag and drop of many Resources onto a shift schedule
- Easily identify a shift with the shift icon

- Create new booking/appointment/shift assignment* directly within the Scheduler via click and drag (see instructions below)
- Drag and drop shift assignments to other days/times or change the duration by dragging start or finish boundary lines
- Reassign a shift assignment from one person to another using drag and drop
- Create multiple shifts per day (providing the ability for example to schedule an OT shift)
- Hover over a shift assignment to quickly review shift details, including notes
- Addition of tooltips to shifts, allowing for note warnings and note details to be added to a shift in Scheduler, ShowMgr GO, and crew portal. Any shift that has a “Note” value set will show a “!” in its block display. See more information in our article Add notes to a shift assignment
- Right click on the shift assignment to modify or delete information or start and end times
- Positions and resources are separate
- Color coding and icons on the Scheduler, similar to the My Portal
*Note: Make sure your Scheduler view (at the bottom of the Scheduler) is set to Resource List to make an Appointment or Shift Assignment, or to By Element and then click on the Position to make a Booking.
The Scheduler header has two new options for shifts to allow the user to search Scheduler via various filters: Shift Search and Shift Lookup. Both options load shifts into the header based on their shift pattern and help refine this section to only see shifts you want to see.
In the header, just click on Shift Search and select which saved search you would like to display (if you do not have any saved searches, you'll need to create them on the Manage Shifts page). You should see all of those shifts show up in the top display.
Note: This header search is 'sticky', which means when you come back to Scheduler next time, the same search view will be displayed.
You can toggle shifts on and off via a menu button.
To turn shifts on, you click the Shift Off button. Doing so will toggle the state to be active, change the button text to Shifts On, and color the button a blue cyan. This button also enables the following features:
- Recur Shifts: Select the resources you would like to recur shifts, select Recur Shifts from the shift menu button and then enter your clone from + days to clone, recur start and recur end by.
- Apply Shift Template: Selecting Apply Shift Template from the menu list will show the apply template form letting the user select a template to apply and provide date range details for when to apply
- Delete Future Shifts: To delete future shifts for many resources, select your resource to clear for, select the Delete Future Shifts from the shift menu button and then enter in the date range you would like to delete. For more information on clearing vs deleting shifts, see our article here.
You do not need to use the header Scheduler to make shift assignments.
One option is to click on Scheduler and drag to create a new shift. You can select many resources at one time and then drag to create a new shift for all selected. The same create shift assignment form will show allowing the user to dial in the assignment details.
Another option is to drag and drop resource names onto a shift in the header. This will load the shift assignment page with the shift and selected resources. The user can then select for how many days and weeks they would like to apply the shift for.
With this new feature, the Scheduler now mimics some of the style aspects of My Portal. Now on Scheduler you will notice each square on the calendar, has a small icon in the top left hand corner. These icons denote whether it is a shift, an appointment, or an assignment.

Here are some other useful articles about shift management: