Summary
The shift assignment functionality allows you to assign shifts to an individual or a group of Resources. This feature empowers those responsible for booking Resources by making them aware of potential Booking conflicts due to shift changes. When shifts are assigned to Resources, this data trickles through to the Scheduler and the Crew Portal. There are two ways to assign shifts: in the shift assignment workspace or via the Scheduler. This article walks you through the shift assignment workspace navigation and functionality.
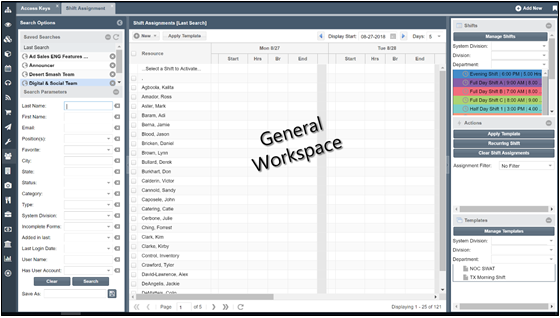
Navigating the Shift Assignment Workspace
- From the main left-hand navigation menu select Resources > Shift Assignment
- If you are a first time user, you will see all system Resources displayed in the general workspace
- For regular users, you can load saved searches that have trickled down from the Scheduler or conduct a search in the search panel for Resources to load into the general workspace
- To see information on Shifts, Actions, and Templates, use the right-wing panel
Creating a Shift (Option 1): from the Shift Assignment Page
- Click
 button located at the top left the General Workspace. Choose Shift
 - Complete all mandatory fields and any relevant optional fields
- Click Save to save the Shift. The newly created Shift will be listed in the right-wing panel under Manage Shifts
- To apply a color to the newly created Shift, click
 located on the right-wing panel. The Manage Shifts pop-up window will show all Shifts
 - You can assign a color to a Shift by clicking the first box of the Manage Shifts pop-up box to select a color
Creating a Shift (Option 2): from the Manage Shifts Window
- Click at the top of the right wing of the general workspace to add, delete or create shifts
- Click the
 button at the top right hand corner of the Manage Shifts window
- Double-click any of the top row columns to add Shift information (title, division, group, start/end time, etc)
- Click the update icon
 to save the Shift for future assignments
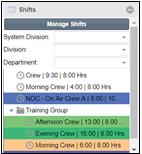
Creating Shift Groups
Shift Groups are folders that group Shifts together by department, teams, or regions. If using Shift Groups, you should create the Shift Group before creating any Shifts.
- Click on Manage Shifts on the right-wing panel.
- At the bottom of the Manage Shifts pop-up window, click the Manage Groups icon

- Click the
 to create the Shift Group name
 - Click Update to save your Shift Group
Adding Shifts to a Group
- From the general workspace, click Manage Shifts in the right-wing panel to open pop-up window to edit existing Shifts
- Double-click the Shift you want to add to a Shift Group
- From the Group dropdown, choose the group
- Click the update icon to save the Shift for future assignments
Assigning Shifts to Resources
- Use the search filter to find Resource(s) to load into the general workspace

- Choose a Shift to assign to Resource by clicking on the Shift in the right-wing panel to load it to the general workspace

- Choose the Resource(s) you want to assign the Shift to by clicking the check box next to Resource’s name
- Click
 to assign the shift to the Resource(s) for an entire week (if 5 days is user’s default) otherwise click
  to load the Shift for the day
Assigning a Recurring Shift
- It is possible to assign a Shift to a Resource over a custom timeframe. First, use the search filter to find Resource(s) to load into the general workspace
- Select the Resource(s)
 you would like to assign a recurring Shift and in the right-hand wing panel click
  to open up the Shift Recurrence window
 - Enter an end-date for the Shift
- Click Submit to save and complete
Clearing Shift Assignments
If a Resource's Shift has changed and the Scheduler is unaware of future Shifts assigned to a Resource, clearing all Shift assignments for the Resource is the best option. To clear all Shift assignments:
- Use the search filter to find Resource(s) to load into the General Workspace
- Select the Resource(s) to clear Shift assignments for and click
 located in the right-wing panel
 - The pop-up confirmation window, will ask if you’re sure you want to delete ALL shift assignments for the selected resource(s). Choose Yes or No
Here is a useful article on deleting and clearing shifts: Clearing existing shifts and deleting future shifts
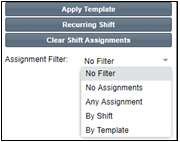
Using the Shift Assignment Filter
These filters allow you to choose which Resource attributes you would like loaded into the general workspace, making it easier to pick which Resource(s) Shifts to edit. Change the Assignment Filters based on your preferences
Find unassigned resource bookings
- From the main left-hand navigation menu, select Orders
- In the search filters, under Unassigned, select Resources
- Click Search. The grid will now display unassigned resource bookings (not unassigned Resources)

Here are some other useful articles about shift management: