
Summary
You'll need to build a budget in ShowMgr before you can move your Project to an Active status. This article walks you through the necessary steps to create a new budget in ShowMgr via the Budget worksheet and discusses the limitations of creating a Budget from a Project directly, but shows you how to assign a Budget to a Project.
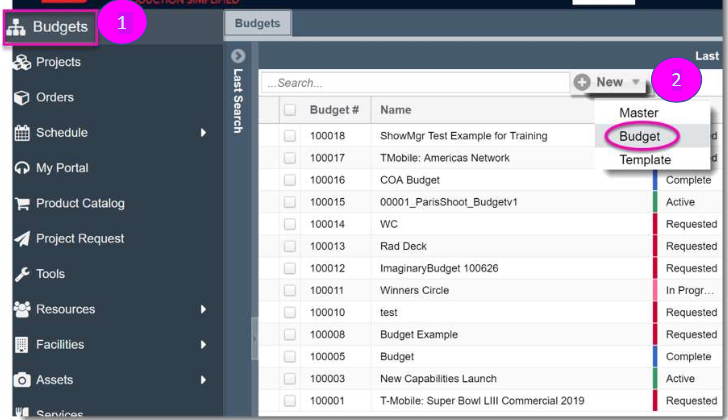
- From the main left-hand navigation menu, select Budget (or Bid if that is what is denoted in your instance). This will open the Budget grid and display all existing working budgets available to you
- To create a new budget, select the + New button next to the search bar and select Budget from the dropdown menu options
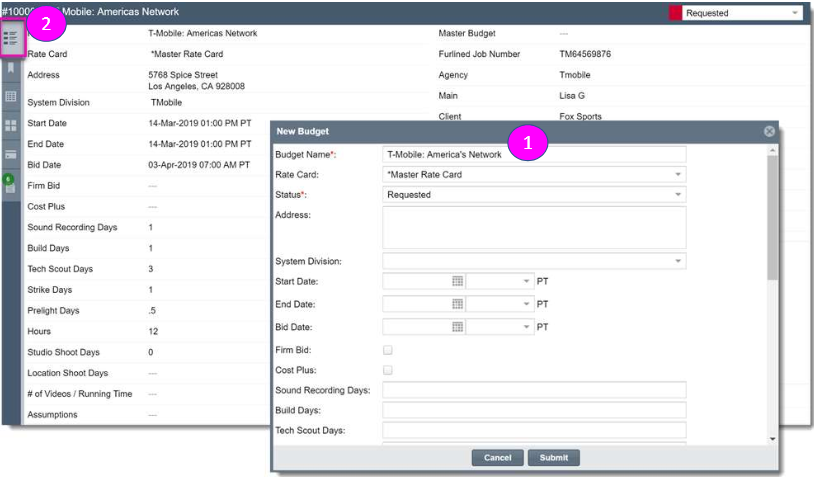
- Complete all required fields in the New Budget Creation page. Click Submit to automatically open the newly created budget
- Select the Details icon on the Driver tab to view the budget details page
While you can assign a Project to a Budget, you cannot create a Budget from a Project through the Project itself. Instead you need to create the Project and then create the Budget separately and then assign the Project to the Budget using the Budget attribute in the Project Details page. Note: If the Budget attribute is not enabled for Project, use Order Admin to enable it.
Here's how to assign the Project to the Budget via the Project worksheet tab:
- From the main left-hand navigation menu, select Projects
- Select your Project. Navigate to the Worksheet tab on the left hand side to assign your quote/budget. Note: If there are existing line items in your worksheet when you start a Project, do not delete them as they may be associated with other Orders on the schedule
- Find existing Packages by typing directly into the …Add Element… window at the top of the Worksheet

- Expand the Package folders and choose the Package that you need. Click the green plus sign to add the element to your Worksheet (you can add multiple items from this drop-down if desired)

- Click Done. The worksheet will automatically populate with the Package(s) chosen
- While the rates for chosen Elements will usually display in the Worksheet, Units must be added to complete the process. Double-click in the Units column to add the number of days/ hours/ weeks needed, making sure the Unit of Measure (UOM) corresponds. Click Enter and the markup is added with the total for that element is displayed. In the event there is no established rate for the service so you will need to double-click into the Rate column to add a lump sum

If you need to find the Budget or Bid's owner or other main contacts:
- From the Budget / Bid worksheet, double-click the Budget / Bid to open up its details
- Expand the right-hand wing to find the Contacts section. The Budget / Bid creator is denoted by Created By. Here you can add any contacts by clicking on the + sign. These individuals can be alerted when changes are made to the Budget / Bid if you have appropriate Alerts set up. See our article Creating and Managing Email Alerts for Orders and Projects for more information