Summary
In ShowMgr, searches can be initiated and saved for users to find and quickly load saved Project and Order search results into the grid views. This article walks through the different methods for creating, saving, and modifying searches related to Projects and Orders and then manipulating the different display settings to alter the information displayed. For a basic guide to the order grid, see our article A Guide to the Order Grid Layout and Functionality
Searching for Projects and Orders and saving searches
- Navigate to Projects or Orders from the ShowMgr homepage
- In the Search field, apply your chosen search filters such as Status, Start Date, System Division, etc
- Click Search to load results into the Grid
- To save the search, click the Save button. Note: To open the saved search you need to double-click the name in the Saved Searches section. The grid will be automatically populated with the results
- In the same view, you will see some additional options for displaying the results:
- The Options Panel will provide different options for displaying Projects and Orders
- The Orders Options give users additional bottom display options
Viewing Project and Order Contacts and Owners
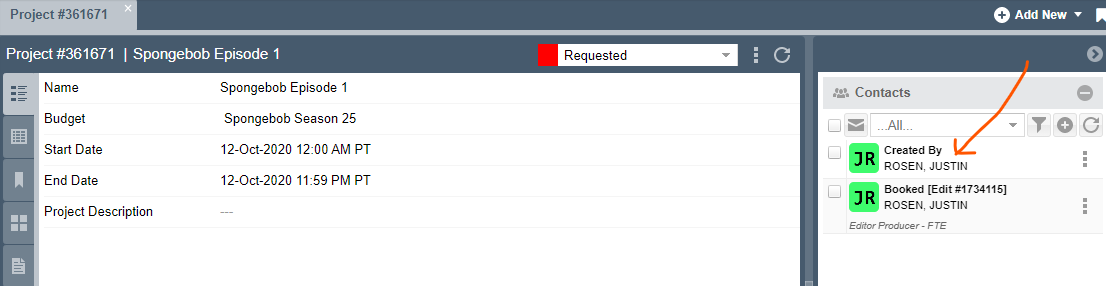
From either the Order or Project grid, double-click on an Order or Project to open the details page. On the right-hand wing you will see a list of all Contacts. The Project or Order's original creator (or author) is listed under the Created By heading.
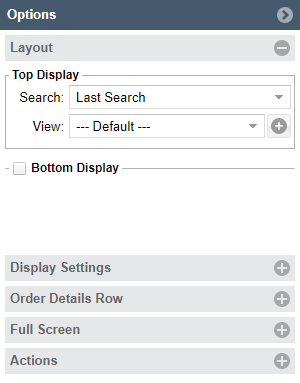
"Top display" option
- In the Options Panel (on the right hand side of the screen), under Search choose from list of saved searches
- Under View choose which Project or Order attributes you want to display by clicking the (+) sign to open the Grid Configuration window. All default attributes common to all Orders will be listed. Users can drag and drop to reorder columns, click the (x) to remove an attribute, or drag and drop in other Order Classes into the Grid display
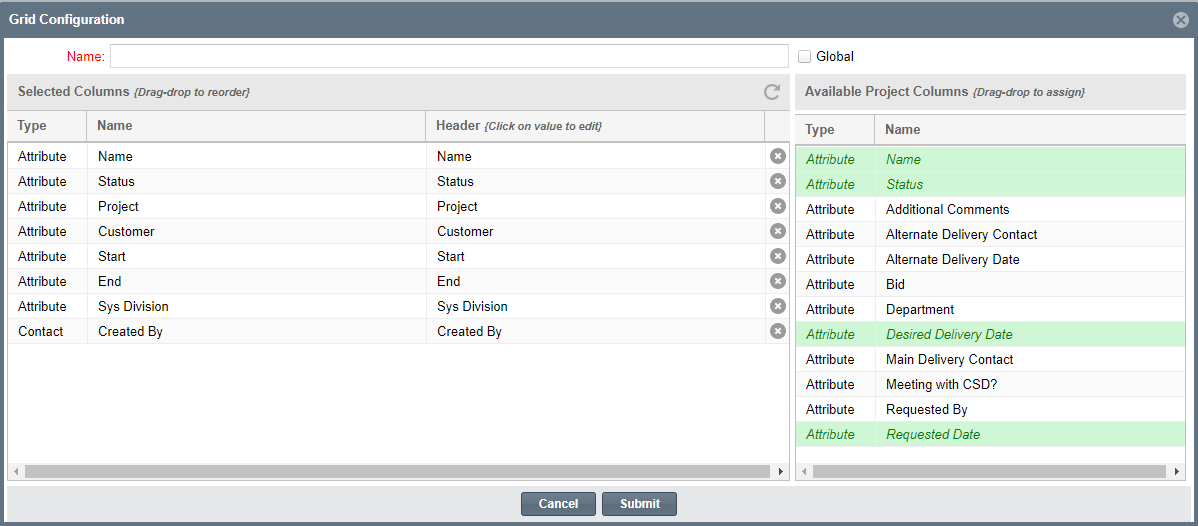
- Name the new configuration in the top Name bar and click Submit to save your configuration
"Bottom display" option
The Orders Grid can display two different sets of Order searches when the Bottom Display box is checked. The Top Display will show in the top half of the screen, which the Bottom Display will show up in the bottom half of the screen.
Changing the project and order display settings
Users can personalize their grid display by altering the following settings from the top right corner drop down menu:
- Refresh
- How often the grid will automatically refresh to reveal new Orders
- Date Format
- Four different format types depending on your preferences
- Flash
- View Orders whose details have recently changed with the Flash feature. When turned on, all Orders that have changed in the last 5, 10, 15, or 20 minutes will flash repeatedly
- View
- In Projects, use View to change how the Order information is displayed in the Grid

- Next Page on Refresh
- If Orders are displaying on multiple pages, during refresh the Grid will advance to the next page of orders
- Hide Paging Toolbar
- Will show on the digital display if this is not hidden

- Row Highlight
- Creates block highlights of Grid Orders
For more information on configuring your Order grid layout, please see our article A Guide to the Order Grid Layout and Functionality
Orders detail information display
Users can choose how Order information is displayed in the Order Details Row by changing the following settings:
- Show
- Order details
- Elements
- Which elements (Resource, Facility, Asset, or Service) the user wants to include in the Order display when the display is expanded
- Auto-Expand
- Order details to see information about additional elements
- Include Order Description
- An option for Orders that have a description field
- Include Resource Avatar
- Photo of Resource assigned to the Order (Note: if the Resource(s) hasn’t uploaded a photo to their profile, the avatar will be the Resource’s initials)
- Include Booking Status
- Choose which statuses you want to show
"Full Screen" display
After display preferences have been chosen, the user can display Order Grid by toggling between the panel and full screen views
1. Choose Theme Default or Dark
2. Choose a font size between 11 to 24 pt
3. Click Toggle Full-Screen to initiate your selection
4. To return to the Options panel, click Options panel and click the arrow to Toggle Full-Screen
Setting up a customized grid view
After navigating around the Project and Order grids and familiarizing yourself with the layout and functionality, you still might want to create a customized grid view (e.g. with different columns). You can create as many views as you like and rotate through them based on your needs.
To create a customized grid view:
- From the main left-hand navigation menu, click on Projects or Orders to open the grid. Then locate the Layout Options in the right-hand wing of the grid
- Select the + button
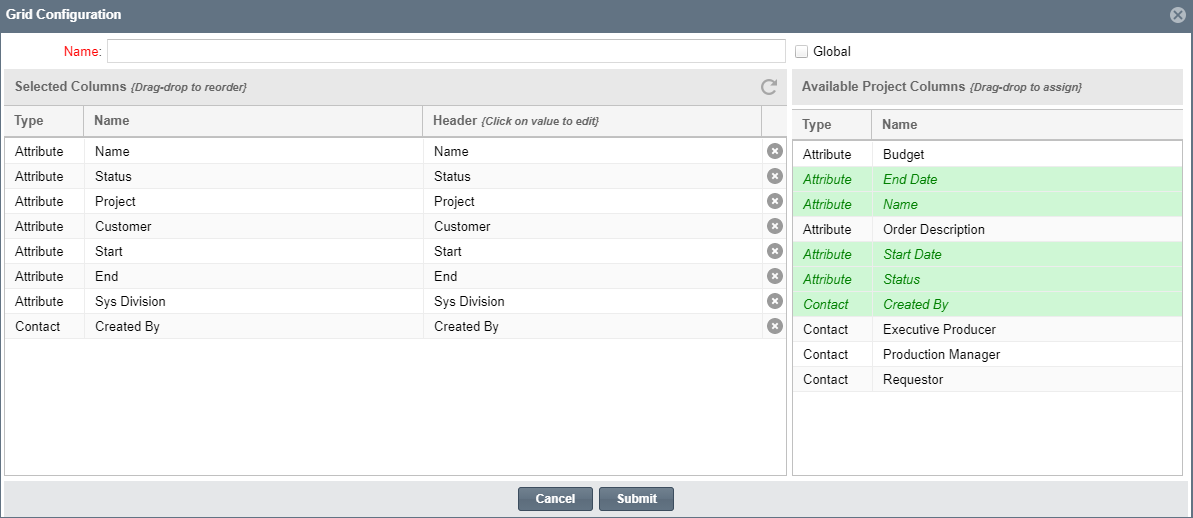
 to add a new view. The Grid Configuration window will open
 - In this window you can:
- Give your new view an easily identifiable name
- Select Global if you'd like the view available to others
- Drag-drop any new columns across to the Selected Columns section
- Re-name any column headers by clicking on the name and editing
- Reorder the columns by using the same drag-drop feature
- Delete any columns by clicking the X button next to the column you want to delete
- Click Submit to save
- The view you have selected in the layout options wing will retain its state, so the view you last left the grid on will be automatically set the next time you log in
- Once you have chosen the columns for your customized grid view, just drag and drop the columns so they are organized (sequentially or otherwise) in a way that best suits your needs