
Summary
This article walks you through the basics of scheduling and approving a Resource's time off. It will provide an introduction to creating appointment orders, steps for reviewing and approving time off, and how to create time away policies that drive time pools (e.g. PTO)
If a Resource is unavailable to work a certain day or time slot, is scheduling PTO, is sick, or needs to schedule drive time, the Resource must create an appointment order in ShowMgr. Upon doing so, the time period that the Resource is unavailable will be blocked out in the Scheduler so they cannot be assigned to an Order.
Note: You do not need to be a Scheduler in order to create an appointment order. However this functionality is only available for ShowMgr users. If a contract laborer is unavailable to work a certain day or time slot, they must contact their ShowMgr contact person
- From the main left-hand navigation menu, select Orders to open the Orders Grid
- Click Add New
 in the top menu and select Order from the drop down menu to open the Create Order window
 - Select Order Class: Appointment, which will open up the new Appointment window
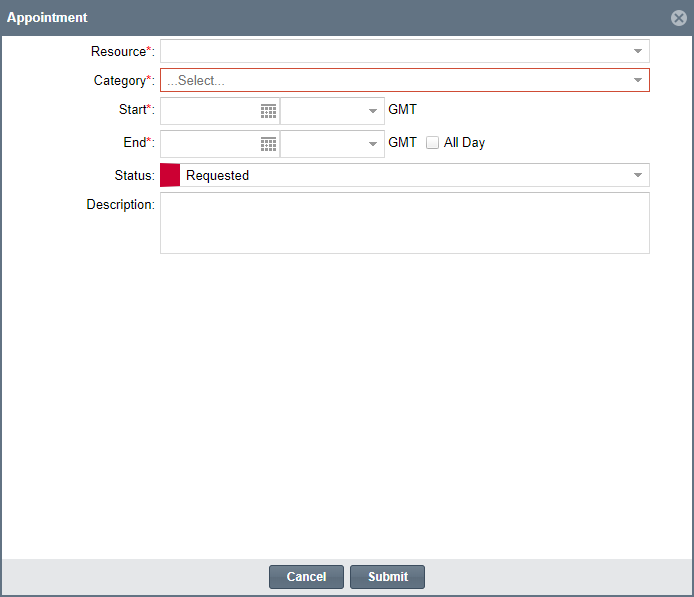
- Verify the correct Resource is listed in the Resource field
- Choose the correct Category or reason you or the Resource are unavailable for work e.g. PTO, Sick Leave
- Fill out any of the remaining fields
- Order Start/Order End: Select the day(s) and time(s) that you (for personal entries) or the Resource are unavailable. Select the [All Day] check box if you or the Resource are unavailable to work the entire day
- Click Submit to save and close. The appointment will be saved as Requested by default, ready for approval. The hours will not be deducted from the balance until the order is approved
- From the main left-hand navigation menu, select Schedule > Scheduler to open the Scheduler
- Using the Search fields, filter Resources by the Resource who needs an appointment booking/order
- Select the amount of time for the Resource's appointment directly on the Scheduler
- Select Order Class: Appointment, which will open up the new Appointment window
- Verify the correct Resource is listed in the Resource field
- Choose the correct Category or reason you or the Resource are unavailable for work e.g PTO, Sick Leave
- Verify the correct times and dates are listed based on your Scheduler selection
- Fill out any of the remaining information
- Click Submit to save and close. The appointment will be saved as Requested by default, ready for approval. The hours will not be deducted from the balance until the order is approved
- From the main left-hand navigation menu, select My Portal
- Select the Appointments Tab
 from the left-hand side of the portal to open up a consolidated view of your appointments. Here you can create a new appointment and also manage any existing appointments
 - Select the New button
 to create a new appointment booking
 - Verify the correct Resource is listed in the Resource field
- Choose the correct Category or reason you or the Resource are unavailable for work e.g PTO, Sick Leave
- Verify the correct times and dates are listed based on your Scheduler selection
- Fill out any of the remaining information
- Click Submit to save and close. The appointment will be saved as Requested by default, ready for approval. The hours will not be deducted from the balance until the order is approved
- From the main left-hand navigation menu, select Orders
- Using the search fields, filter your search by appointment orders with a requested status
- Double-click the appointment order that requires approval to open up the Appointments window. Select the new status (e.g. Approved) from the drop-down menu. If you need to see the history and any previous edits to order, click the Audit button
 at the top of the window
 - Click Submit to save
- From the main left-hand navigation menu, select Resources > Time Away Approval. This page shows all of the system's appointment orders in one place
- Use the menu at the top of the Grid to narrow your search. You can filter by Resource, Date, and Department. If no requests show up, try just clicking the Search button
 at the top right of the view

- Select one of the appointments to load the appointment information in the right-hand side of the screen
- Review the appointment's details, and select the new status (e.g. Approved). You can also edit the appointment, add comments to the comments box, or review conflicts here
- You may need to refresh your page in order to see the updated status on the appointment order

Once the Staff/Crew has created an appointment from their portal for PTO/Holiday/etc this appointment is added to the system and is registered as an Order (accessible via the Orders grid and the Time Away Approval grid). The creation of an Appointment Order can act as a trigger for an Order Alert.
Similarly, when an Approver sets an Appointment Status to Approved, this will approve the time off and can act as a trigger for an Order Alert.
Here's how to configure Order Alerts for Appointments:
- From the main left-hand navigation menu, select Admin > Communications > Order Alerts to start configuring
- For the initial Appointment Creation alert:
- Set the Alert Type to Order Created
- Select the Order Class Appointment
- For the Appointment Approved alert:
- Set the Alert Type to Order Attribute Change
- Set On Change of Attribute to Status
- Select the Order Class Appointment
- Set the Attribute Value to Approved
- For the initial Appointment Creation alert:
- Then use the Configure Alert drop down to select who should receive the alert. However this step is somewhat unnecessary as Staff/Crew will get a push alert to their app if their Order changes status.
Note: A Resource does not need a policy assigned to them in order to have appointments, however in order to have a pool of time, they need a policy assigned to them.
- From the main left-hand navigation menu, select Resources > Time Away Policies to see all of your existing time away policies
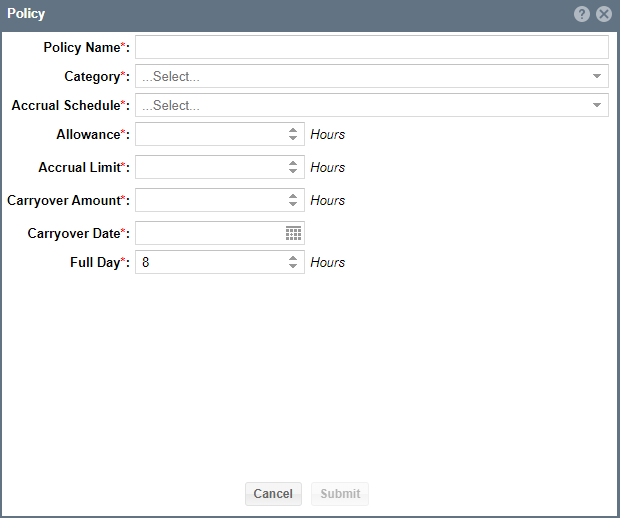
- Select the New button
 to create open up the new policy window
 - Fill out all of the fields. Be sure to give your policy an easily identifiable name and category so it is easier to search for and organize your policies in the future
- Click Submit to save. Once saved, you can assign the policy to a Resource
- From the main left-hand navigation menu, select Resources > Manage Resources to see all of Resources
- Search for and click on the Resource that needs a new time away policy assigned to open up their details (you can either double-click or select Edit from the hamburger icon
 )
) - Select Time Away Policies from the left-hand menu
- Select the Modify button
 to assign a policy to the Resource. This policy will drive the Resource's time pools (e.g. PTO, Sick Leave)
To check a Resource's existing time pools (e.g. PTO, Sick Leave):
- From the main left-hand navigation menu, click on Resources > Manage Resources
- Search for and click on the Resource's name
- Select Vacation / Unavailable Dates from the menu. Here you will able to see a list of the Resource's accrued time. A Resource could also have a negative balance if they had exceeded their time allotment in a previous booking