Summary
One of the most widely components of ShowMgr is booking Elements and adding them to Orders. This article walks you through a step by step example of creating an Order for a Production Truck. This example will teach you how to search for existing orders, create an Order for a Production Truck (Facility), booking the Production Truck, modifying the rates, adding additional Elements to a Booking, and uploading documents to help you better understand the features and functionality of ShowMgr
Searching for Existing Orders by Order Class
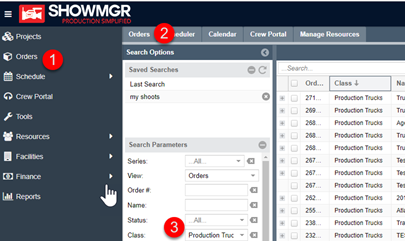
- Log into your instance of ShowMgr and click Orders from the left-hand navigation panel
- Or, if pinned, click on the pinned Orders Tab to open the Order Grid
- Under the Search Parameters select 'Production Trucks' from the Class Filter to show all of the existing Orders related to Production Trucks
Create a New Order e.g. Production Truck
1. At the top of the Order Grid, click the  button

2. Choose the ‘Production Trucks’ Order Class to open up the Order Form window
3. Complete the Order Form (field definitions are in the table below)
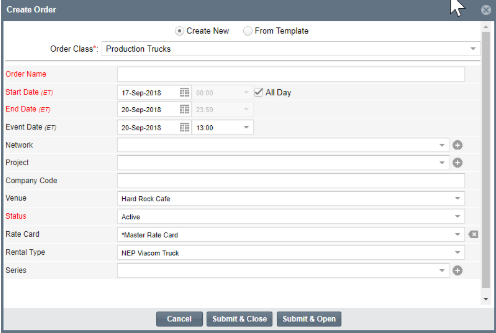
- Order Name
- Name should follow department nomenclature
- Start Date/End Date
- For multiple day bookings choose the dates, then click the All Day checkbox
- Event Date
- Include date and time of live event
- Network
- Choose Network that Truck booking will be billed to
- Project
- Choose Project when booking is confirmed as part of an Episode or Series event
- Company Code
- When applicable
- Venues
- Venues can be added by your ShowMgr Business Administrator
- Status
- Defaults to Active but review and choose other status options when they apply at the time of Order creation
- Rate Card
- Defaults to Master Rate Card, so remember to change to the relevant rate card e.g. Trucks Rate Card
- Rental Type
- Choose based on options available e.g. ABC Truck
- Series
- When shoot is for a specific Series
4. Click Submit & Open to begin creating multiple day bookings
5. Click Submit & Close when you will be completing the details of the booking later
Booking a Facility e.g. Truck
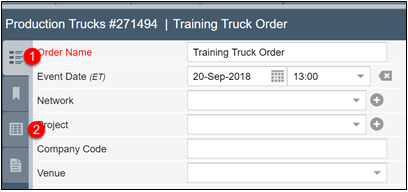
1. When you Submit & Open, the Details tab will be active
2. Click the Worksheet Tab to begin your Booking
3. Click the Advanced Booking icon at the top right of the Worksheet
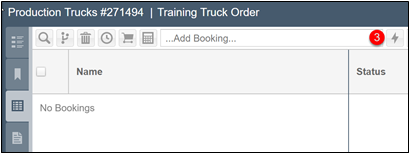
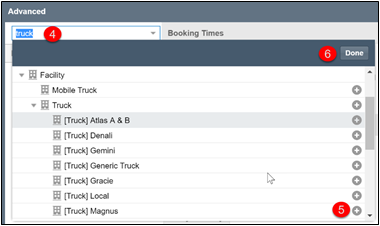
4. Browse for the facility type (in this example, type in ‘truck’ or the exact truck name to the search bar)
5. Click the (+) sign next to the chosen facility and it will highlight green
6. Click Done button
7. Change the Booking Time accordingly to match your desired Days, Hours, and Minutes

8. Choose the Booking Pattern. First choose the days that you want to apply the Booking to, because the Pattern calendar always defaults to end of the current month. Also choose the Pattern Type you would like to apply (e.g. Every Day)


9. After selecting the Pattern, the chosen days will be reflected in the Calendar and Bookings for each truck will be created
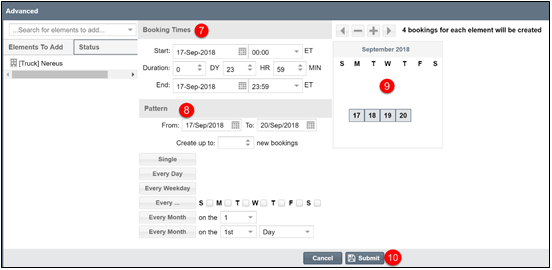
10. Click Submit to save and close the Advanced Booking window
11. Click the  button to return to the Worksheet
Adding Cost and Revenue Rates to a Booking
Users will add Cost and Revenue Rates for each Booking based on the use of the truck for each booking date
- Click the plus sign to expand the four truck Bookings
- Scroll through booking attributes to begin adding Cost and Revenue information
- For this example: A Nereus Truck has been booked for 4 days. However, the rates and revenue costs will change based on the day rates
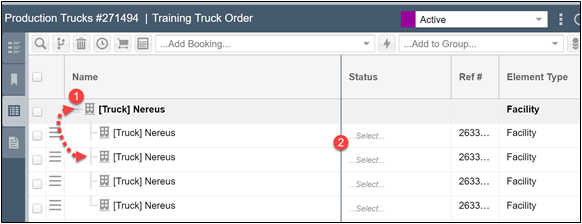
- In the Cost column, double-click in the Rate field to choose the rate that applies
- In the Revenue column, double-click in the Rate field to choose the rate that applies
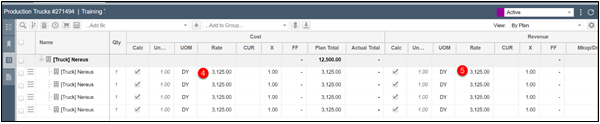
- Current rates may be listed, otherwise input any dollar amount in the rate field/s
- Before Closing the Worksheet, confirm that Plan totals reflect identical Revenue and Costs
Adding Additional Elements to the Booking
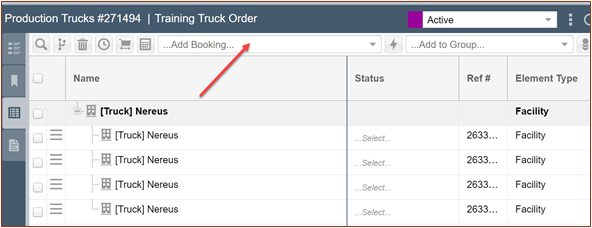
You can always add an additional Element to a Booking. In order to do so, use the Add Booking field to load additional Elements to the Booking/Order. In this example, you could type Tech Manager name, Truck Overtime, Truck Travel Costs, and much more.
Uploading Documents to an Order
Any external documents that should live throughout the lifecycle of the Order can be uploaded to the Order in ShowMgr.
1. Navigate to Orders from the left hand navigation menu to open the Order Grid. Open the Order from the Order Grid
2. Click the Documents driver button
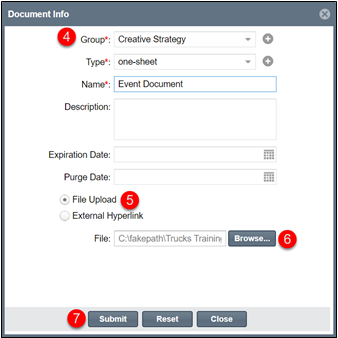
3. Click the (+) sign to open the Document Info window
4. Fill out all appropriate fields
5. Users can upload files or add an external hyperlink
6. To upload a file, click the Browse button to access documents from your desktop
7. Click the Submit to close Document Info window