
Summary
Crew Portal aka My Portal is a ShowMgr module used by Resources who need to accept and actualize time, view assigned shifts, work history, work assigned to their workgroup, and create appointment orders. This article walks through how to find and navigate the Portal, accept and actualize work, view hours worked, and request and record time away
- Launch Google Chrome (from our experience, ShowMgr works best on Chrome)
- Type https://mycompany.showmgr.com into your browser (replacing "mycompany" with your company's name)
- After selecting Login, you will be given a selection of Single Sign-on (SSO) providers supported for your ShowMgr instance. Select "Log In With Google" to login via Google SSO and to access your account
- On the left navigation menu, select My Portal. The Portal has a security access level that gives users the ability to view in real-time all assignments and bookings associated to the user logging into the Portal. The Crew Portal will open to a Gregorian style calendar view by default and will provide interactive updates (update capabilities are controlled by your System Admin) for fields such as status (e.g. in-progress, complete) as well as enter detailed comments and notes
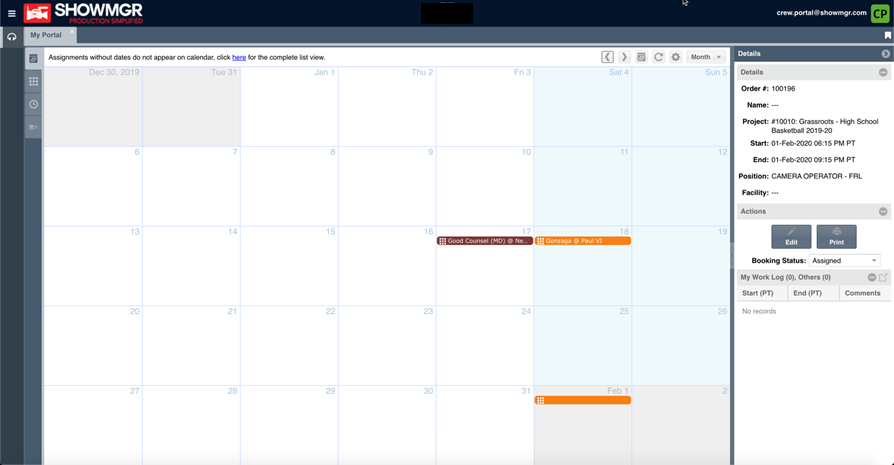
- Once you add an individual as a booked resource, then they will see their projects in their portal. They will also see it on the mobile app, ShowMgr GO. Remember, for Bookings and Orders to show up an individual's "My Portal" that person has to be specifically assigned and confirmed.
- If none of your Bookings are showing up in your calendar and you know that you are assigned to Bookings, please let your Admin manager know they need to set your Resource profile to a Booking Status that will allow you to see it in your Portal. They can do this from their Order's worksheet under the Status column.
You can navigate through the Crew Portal with ease by clicking on any of the Driver Tabs on the Portal's navigation menu. Note: This menu may differ slightly for you based on your company's preferences.
 Calendar
- Used to view Shifts and Orders assigned to you and includes the ability to see the details of Orders, to Accept Work Orders, or to Complete and Actualize time spent on an Order
 Work Queue
- Used to view all Active or Assigned Orders for you or your workgroup and includes the ability to see the details of Orders, to Accept Work Orders, or to Complete and Actualize time spent on an Order
 Work History
- Used to view the history of all works assigned to and completed by you
 Appointments
- Displays all bookings/assignments and allows the you to create personal and/or time off appointments. For instructions on how to book an appointment, schedule PTO, etc see our article Managing Appointments: Scheduling and Approving Time Off or see the section below
 My Info
- Includes system profile information, mobile access key to give users access to the Mobile App, and link to app that can be downloaded from your IOS or Android App Store
Resources can accept, actualize and complete work from the Crew Portal with the following steps:
- In the Crew Portal, click on the Calendar or the Work Queue Driver Tab
- Single click the Order assigned to you to reveal the Order Details panel on the right
- In the Order Details panel, you can edit the Order, Accept Work, Assign to Workgroup, Decline Assignment, or change the status (e.g. to Complete)
- To Complete and Actualize time, under the Actions panel, click the Complete button
- You will see a Complete Order screen. If everything is complete, click Set Complete. However, if you still need to complete and actualize time, click Set Complete & Add Time
- Add actual time used to complete the Booking, then click Submit
- Navigate to the Crew Portal
- Click on the Work History Tab
 to open up your work history. Expand the right-hand wing menu. When you click on the booking you'll be able to see the event/day worked and get access to the work log (hours posted for the day)

The ShowMgr Crew Portal can be used to request and record time away.
- In the Crew Portal, select the Appointments Driver Tab
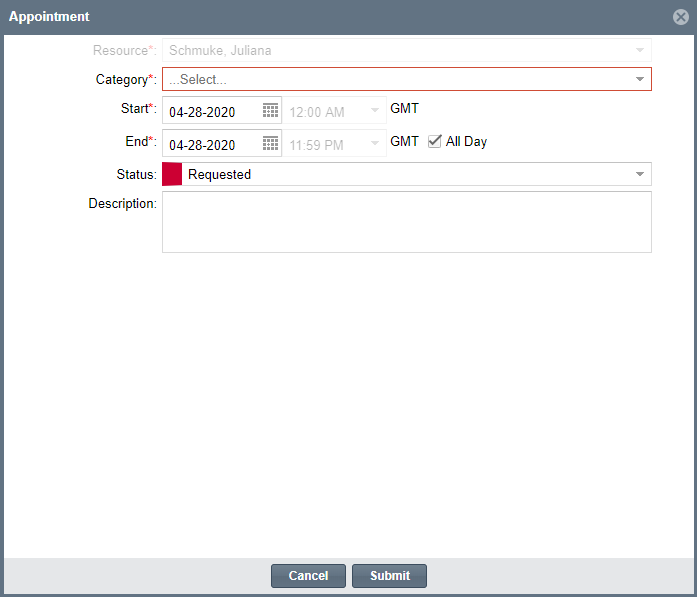
- Click the New
 button to open the New Appointment window
 - Choose your requested dates
- Choose time away options from Category dropdown
- Click Submit to save
Note: For non-personal time records (i.e. all other Resources), you can log paid time off or sick leave by navigating to Resources > Work Log and selecting the New button to log a request
For users that are working on projects or linked to a project (i.e. clients), they can use the primary features of the application that are typically hidden from crew, freelancers, etc. If a user is a contact on a project, then the easiest way to find their projects is using the My Contact Type search field on the project grid. Below is an example where the user is set as a production manager on a project and it can be easily found by using the Contact Type filter. You can then save the search and use it throughout the system.
Example: Finding a Production Manager's projects
- User's role is "Production Manager" on the project
- Finding projects from the Project grid:
- If the user is also a project manager, then use the Project Manager search filter field to find the projects they are project manager for
- If the user created or requested a project, they can find their projects using the Created By and the Requestor search fields
- To find the projects related to the Production Manager role, use the My Contact Type search field
- You can then pin any of your projects to a tab or save your search (e.g. with the name My Projects) so you can use it in the future throughout the system, such as on the Calendar or the Scheduler.